Basic techniques first(?)
Music™: Advanced Techniques

Whilst currently I decided to first document all advanced stuff, I still have something for beginners!
(Reposting from main page)
Review & tutorial video from "ChrisLody", telling you basics from the start!
Voiceless video featuring DJ Omnimaga making trance track from scratch!
|
|
|
|
Also, make use of built-in M2K help functionality: Press "O" and scroll to the very end to find it!
GLITCHES: INTRO
I know it might be a discouraging subject to start off with, but I wanted to mention it early to help protect your songs!
I did invest a lot of time into researching glitches as I believe that musicians' tools must be reliable - this chapter will help you keep it that way!
In total, Glitches can be summed to 4 things:
-Memory Leaks;
-Rare save corruption;
-Problematic Note Parameter Modifying;
-Risky external/modified samples;
You can recognize them by unpredictable incorrect behavior either straight away or when reloading project back - most are easily fixable thankfully!
All of them have some kind of random chance happening: some might never see or feel them,
some might encounter them very often.
As scary as they might sound, they are definitely avoidable once you learn about them more!
I'm splitting the chapter into a few sections as to not overwhelm users with those: the crucial knowledge is in this chapter and also "Safe workflow". Detailed explanation is also important to know, so learn about it whenever you feel ready for it!
(last chapter of this page!)
safe workflow
Here's my personal workflow when using Music 2000,
which I consider pretty safe and comfortable enough:
Starting off, I emulate Music 2000 - That lets me use
savestates, easily exchange & backup memory cards,
or even rewind time in critical moments;
A lot of problems seem to be also solved by simply
using CD disk image (best if verified as best dump),
no CD drive-related problems, or scratched disk;
My songmaking process looks like this:
-I do short sessions of music making
(around 20-40m, no more than 1h)
which is then frequently saved;
-I keep few versions of the project
instead of overwriting the same only one
in case current save gets glitchy;
-After saving, I fully restart the Playstation,
(this makes sure I got my memory cleaned properly)
then reload the save;
-Once song is loaded, I double-check if whole songs plays as it should;
(I also recommend to savestate just before saving as extra backup whenever terrible save glitch happens, so you can reload and maybe try saving again!)
Some people tend to only use savestates, but that might not protect you from memory leaks, so best to use both normal saves on memcard & savestates!
Riff effects
Inside riffs M2K provides us per-note effects, though some also use more voices/channels despite having just one note! It's extremely easy to max out 24 channels before you could notice, easily cutting off other effects!
I created tables below so you know how much each effect takes up channel space!
._________CHORDS________.
|[NAME]-[NOTES]-[VOICES]|
|Blue A - 0,3,7,9 - 4 |
|Blue B - 0,3,7,8 - 4 |
|Held A - 0,5,7 - 3 |
|Held B - 0,2,7 - 3 |
|Major - 0,4,7 - 3 |
|Minor - 0,3,7 - 3 |
|Octave - 0,-12 - 2 |
To collect all that information I used Duckstation's "Debug" -> "Show SPU State" for very informative PS1 channel overview!
[ECHO]-[VOICES]
| B L 8 - 5 |
| FIVE - 4 |
| Guitar - 6!|
| M L 4 - 7!|
| M S 4 - 3 |
| Octave - 4 |
| R L 8 - 8!|
| Ring - 5 |
| Room - 2 |
| S L 8 - 7!|
| S S 8 - 3 |
| Seven - 4 |
|Triplets - 7!|

.___ONE-SHOT_EFFECTS___.
|[TYPE]-[NAME]-[VOICES]|
|CHORUS - GUITAR 1 - +2|
|CHORUS - ROOM - +2|
|CHORUS - STEREO - +4|
|PHASE - Octave - +3|
|PHASE - Stereo - +4|
|PHASE - all other - +1|
|REVERB - all - +1|
|SPECIAL - others - +1|
|SPECIAL - WIDE - - +2|
|SPECIAL - AUTOPAN - +2|
If you got effects above enabled, you probably noticed how selecting just those riffs doesn't play them correctly,
(e.g. put any chord effect on a note, then in Track View select only that riff, and play it)
that's because these are played from the last channel at the very bottom of the Track View screen!
For solo-ing to work with those effects, you'd have to select riffs like in the example picture above!!
Chords might use more voices if previous chord hasn't faded out yet;
consider making chords manually!
Some effects (especially phases) will sound glitchy depending on riff volume:
turn down riff volume by 1-3 to see if glitch goes away

--Note length / BPM has no influence over Echo amounts!
--In voice-tight situations, try making your echo manually!
--Reverb (yellow notes) does not occupy channels!
--Retriggering doesn't consume extra channels!

quirks and features

Sometimes selections bigger than screen will make it hard to see where to paste - In such cases I usually try to start selection from right side!
- - - - - - - - - - - - - - -
Sliding makes that note slide to next one.
When making slides, use no-triggers →
for notes right after our slides, finishing them smoothly!
Also, distance between sliding note and one after that decides how slow that slide will be!


- - - - - - - - - - - - - - -

Envelopes can adjust scale allowing to make them deeper or longer as you wish! Whichever scale you will increase, remember to move points when you scale!

From left to right numbers under graph mean:
-Total amount of points on the graph;
-current Point number;
-Position on the graph; (000 = left, 255 = right)
-Pitch Value; (High value = Point at the top)
-X scale size;
-Y scale size;
X scale decides length of envelope: having it set to 1 is equal to 1 step in riff sequencer
(so if you made pitch envelope going from bottomleft to topright, it’s gonna spend that entire 1 step transposing the pitch, and you’ll only hear results after that 1st step)
Y scale decides how high/low pitch can go: if set to 1, them moving envelope point to the very top is same as moving 1 note up in riff sequencer
Example of using Pitch Envelope to make transient:
- - - - - - - - - - - - - - -
Wondered what "-> -> 3" stands for?

(Last 2 fields become
unavailable: 8 -> 6 )
This makes the triggers fit triplet-style riffs!
- - - - - - - - - - - - - - -
"Insert File" enables you to combine multiple songs together - Next song gonna be inserted at the cursor position (pushing any riffs already under the cursor to the right, if there are any!)
This can be used to create empty space in songs:
-Create new project with 11khz short hihat,
make riff with that note in it,
-place enough riffs to represent that empty space,
-save that project,
-load your song where you want empty space,
-use “Insert File” on that new project you just made to make new empty space!
Don’t forget to clean those riffs/samples from memory!

- - - - - - - - - - - - - - -

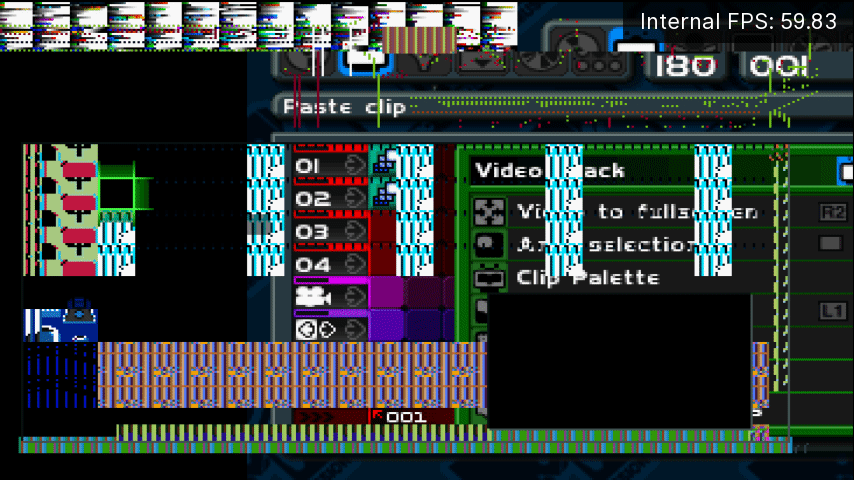
Since built-in help menu is incorrect about what each meter is responsible for, here's actually what each bar represents, from left to right:
Blue: Sound memory taken by the currently loaded samples;
Light Blue: Console memory used by song and video data;
Red: Video memory used by the loaded clips;
Pink: Current MEMORY CARD usage, to show u if u can save!;
In order to lighten up your song, don’t forget to remove your unused samples or riffs from time to time:


LAYER-DISTORTION
(watch the volume though!)
(watch the volume though!)
If you layer riff with itself (like place same riff directly under 1st one, so 2 play at the same time) You will hear it play much louder. What if we try more?
When you layer much more of the same riffs together you'll hear them being pretty distorted, cutting off volume of other instruments, in a sidechain-like style!

It works amazingly well on Kicks, and bassy instruments!
for some already loud instruments like "Distortion" Kick, you'd only need 2 instances at once to trigger effect!
Extreme example here:
7th octave Exploit

You're fully able to place notes beyond default 6 octaves! Octave 7 has 8.5 usable pitches!
(C to G will sound as expected, but G# is just slightly sharper G - all notes after G# will sound exactly same!)
-----HERE'S PROCESS STEP BY STEP-----

-Place note on the 6th octave
-Move your cursor down to 5th octave
-press "SELECT" button and copy note
-Cancel the pasting motion
-Scroll cursor on 6th octave
-Press "O" to open up menu
-Select "Paste copied notes"

If done correctly, the note will be visually glitched, but octave number will display the correct number!)
All we do here is copying the notes while being octave lower, then moving cursor octave higher, notes get correctly transposed regarding cursor position!

(So even placed note on octave 2, then copy it from octave 1 AND "paste copied notes" on octave 6 will work!)
To move around glitched notes beyond 6th octave
you gotta copy and paste them around using "SELECT"
Be careful: If you happen to overwrite it or paste it in normal 6th octave range, you cannot freely move this note around and you gotta use exploit again!
There’s also another, probably much less useful way of crossing 1-6 octave boundary, and that’s by going 16 notes down from lowest note on octave 1 - I once made bass using “11khz flute c3” note but that’s about it
For some reason you can paste glitched notes up to 22th octave, D# being the last available note there - any pasted notes beyond that will appear as octave 1 notes!
SAMPLE Editor

M2K’s unique feature enables precise working on samples: built-in or externally recorded, you can trim, normalize, loop and process your sample... and it’s super buggy.

In order to access sample editor, inside riff press R2 to access “Sample palette” and then R1 takes you to sample editor of highlighted sample
Menu inside it should be pretty self-explanatory, so you can poke around and try things out, and if results don’t sound as good as you want, make use of Undo button that’s at the bottom of the menu!
word of warning: most actions might degrade your sample quality, or introduce unwanted artifacts - sometimes simple trimmimng the sample glitches it up - best to limit your edits as much as possible!
SAMPLE EFFECTS

First of all, remember to UNDO whatever unwanted effects you made, as you only got 1 undo total, and leaving sample editor screen clears that undo!
Below I collected some of my random observations of those “filters”, all of them for purpose of helping you understand how those effects work
for anything I consider to be useful, I’ll put “(!)” next to filter name!
Comb filter(!)

Only thing useful I got out of it was using it as kind of “vocoder” for vocal samples. Setting “Feedback” to 220, low “Delay” values will make it sound like some particular note:
Delay1= C6; 2= C5; 3= F4; 4= C4; 5= G#3; 6= F3; 7= C3
Reverb filter
Depth will increase time between echos
Reflection 1,2,3 are set times when those echos will
happen - having them on the same value or extremely close will sound like comb effect of some sorts
Hi/Lo pass filter

I hope that picture above helps you notice how absolutely bonkers those effects are, and I mean that in a very bad way - they aren’t designed at all, and those “filters” rarely even do what they are supposed to do.
Editing starting phase didnt seem to do much on its own,
Coeffs A are responsible for volume, and first LFO decides how often it's gonna duck in volume - Coeffs B are responsible for some resonance?
Flange Filter
Bigger distance between Start and End delay will increase the vibrato effect;
Increasing the LFO frequency changes the speed from which it goes between ends of vibrato;
Feedback changes the phase and volume of the sample: -256 will invert the sample, and having it set to 0 will silence the sample
Phase Filter(!)

Having default values, and adjusting LFO Frequency to 127 we can observe how the sound is phasing down - if we then change LFO Start Phase to 1000, you can hear how it's going up
Values provided in the screenshot above can guarantee probably useful slow phasing over your sample
Bandpass Filter(!)

Having values set like on screenshot (so LFO freq. to 0, Feedback to 0, and max gain out to 256) will output you a quieter sample, but with reduced bass! Effect is even more noticeable once you apply it twice (it sounds fuller when you also put “Normalize” in-between effects!)
If by any chance one of you kind readers of this guide got some interesting tricks or explanations of effects (and practical uses of each), then it would be really nice if you inform me on Music™ Discord Community!
MEMCARDS
Here's few memory card filled with projects:
1 memcard showcasing sampling song by Decon Theed;
1 memcard with powerful songs by DJ Omnimaga;
2 memcards from me: one with Music1 tracks, other one is very recent and involves M2K;
Tracks are being provided only for educational purpose!

Glitches: Details
Glitches: Details
Glitches: Details
Glitches: Details
=====Memory Leaks; (sporadic)
Memory is not unloaded properly during normal usage.
Things like previewing samples, copying objects, riffs, or even previous song can accumulate:
This can potentially throw many errors when trying to continue working on the project, or crashing software!
-----Solution/Prevention/Ideas:
-Save your project on memory card;
-Restart console (100% safe)
OR "Options" -> "Clear All";
-Reload your song again!
-You should avoid maxing out sample memory;
-Maybe increasing RAM in Duckstation can help?
(No consistent
factors noticed,
Might as well be
"bad luck"!)


=====Problematic Note Parameter;
Glitches happening on notes previously edited often.
Could be a single note, or entire group of them!
Things like "volume", "panning", and "tuning" are likely to be messed up during reload - Most likely to happen when group editing , but not exclusive!
-----Solution/Prevention/Ideas:
-try to copy around notes as much as possible;
-check your project after saving;
-delete glitched notes and save again!

=====Save Corruption; (quite rare)
Reloaded song isn't in the same state as when saved.
1-2 riffs that sound weird or note gets stuck or have no sound - it can be 1 note, or few. It might be easily fixable, sometimes tricky.
(Sometimes during track view you might hear one note not playing, and when trying to see it inside riff, it crashes the software - This can be fixed by splitting riff and removing the part with glitched note!)
-----Solution/Prevention/Ideas:
-Save moderately often;
-Always keep backup of the project
(never overwrite same one on mem-card!);
-You should savestate often;

=====Risky external/modified samples;
- Working with samples is sometimes risky - often there's chance your sound will not load, or become glitched (could be completely or slightly corrupted).
It probably depends on the memory you got, but we couldnt identify any relable factors involved - I had M2K freeze after playing with sample for a while, but nothing savestates or rewind cannot fix!
-----Solution/Prevention/Ideas:

-Save often;
-Follow glitch-free
workflow/guide;
-Pray;
-... I'm repeating
myself, ain't I?
As you can also notice, all those glitches are related in a way: avoiding one sometimes also means avoiding another! Hope this overview gives you more idea about what's going wrong!

